
Python作为一种成熟的脚本语言,发展势头迅猛,长期徘徊在“编程语言谱”排行前5的位置,在脚本语言中仅次于php。通过Python,开发人员可以快速试验一个想法、研究一种对象属性或不同算法,而无需编译、执行和测试任何代码。正是因为跨平台、简洁、优美的特点,它也如同GIS应用渗透于各各个行业一样,渗透在科学计算的各个领域。在GIS领域,几乎可以说开源言必称Python;而ArcGIS则将Python称为the scientific programming language for GIS:ArcGIS Server的猛将Geoprocessing Service依赖于Python,从9.4将Python IDE集成到ArcMap中也可见一斑。
前一阵Flyingis贴出了一篇类似的文章,不过还是通过动手完成一个实例,来看看它在ArcMap中的数据快速处理能力吧。描述:上传到Panoramio的照片都会有位置信息(经纬度坐标),有些朋友非常可敬,上传的照片数量可达上万张。分析一下某个用户拍照的活动范围,是件有趣和有意义的事情。思路:1、利用Panoramio的API,获取指定用户的所有照片信息;2、将关心的信息,比如作者、照片名称、照片文件链接提取出来,并将其存储到地理数据库中。
第一步:获取照片信息。先看一下Panoramio的API,REST风格,返回JSON字符串。比如通过http://www.panoramio.com/map/get_panoramas.php?order=popularity&set=public&from=0&to=20&minx=-180&miny=-90&maxx=180&maxy=90&size=medium,即可按点击次数排序获得世界范围内所有受欢迎的照片。
{
      "count": 773840,"photos": [
        {
          "photo_id": 532693,
          "photo_title": "Wheatfield in afternoon light",
          "photo_url": "http://www.panoramio.com/photo/532693",
          "photo_file_url": "http://static2.bareka.com/photos/medium/532693.jpg",
          "longitude": 11.280727,
          "latitude": 59.643198,
          "width": 500,
          "height": 333,
          "upload_date": "22 January 2007",
          "owner_id": 39160,
          "owner_name": "Snemann",
          "owner_url": "http://www.panoramio.com/user/39160",
        },
        {
          "photo_id": 505229,
          "photo_title": "Etangs près de Dijon",
          "photo_url": "http://www.panoramio.com/photo/505229",
          "photo_file_url": "http://static2.bareka.com/photos/medium/505229.jpg",
          "longitude": 5.168552,
          "latitude": 47.312642,
          "width": 350,
          "height": 500,
          "upload_date": "20 January 2007",
          "owner_id": 78506,
          "owner_name": "Philippe Stoop",
          "owner_url": "http://www.panoramio.com/user/78506"
        }, ...
      ]
    }
Panoramio文档说有773840张,但是JSON里的count只有338张,搜其论坛,发现这是一个bug。当然,为了安全起见,一次请求最多只能返回100张照片的信息,Python刚好来完成若干个“100”的拼装任务。代码如下:
import arcgisscripting,json,urllib,os,threading
lphotos=[]#list saves all photo json objects
lock=threading.Lock()
#function to construct the panoramio request url and retrieve the corresponding photos as json array
#for eg: http://www.panoramio.com/map/get_panoramas.php?order=upload_date&set=139922&from=0&to=20&minx=108.355671725&miny=33.807692976&maxx=109.475020647&maxy=34.732003828&size=medium
#set: public (popular photos); full (all photos); user ID number
#size: original; medium (default value) ;small ; thumbnail ; square ; mini_square
def retrievephotos(set,fromindex,toindex,size):
global lphotos,gp
#extent=r"&minx=108.355671725&miny=33.807692976&maxx=109.475020647&maxy=34.732003828"
extent=r"&minx=-180&miny=-90&maxx=180&maxy=90"
url=r"http://www.panoramio.com/map/get_panoramas.php?order=upload_date&set="+set+"&from="+str(fromindex)+"&to="+str(toindex)+extent+"&size="+size
try:
jsonresult=json.read(urllib.urlopen(url).read())
except:
raise Exception,"get panoramio result error"
photos=jsonresult["photos"]
if len(photos)<toindex-fromindex:
print "warning: can't get photos from server "+str(fromindex)+"--"+str(toindex)
#gp.addwarning("warning: can't get photos from server "+str(fromindex)+"--"+str(toindex))#typeerror:'no type' object is not callable
else:
for photo in photos:
lock.acquire()
lphotos.append(photo)
lock.release()
return jsonresult["count"]#the total of photos of the specified set
#use multithread to retrieve photos, the number of threads=(end-start)/100
#start: 0 in usual
#end: the total of photos
def getphotolist(set,start,end,size):
list=[start]
while list[-1]<end:
list.append(list[-1]+100)
threads=[]
gp.addmessage(str(len(list))+" threads has launched...")
for i in list:
threads.append(threading.Thread(target=retrievephotos,args=(set,i,i+100,size),name=str(i)))
for t in threads:
t.start()
for t in threads:
t.join()#suspend the parent(main) thread until this thread is over
在运行过程中,发送请求(请求100张照片的信息)后等待服务器响应会花费一些时间,于是就采用Python中的多线程,来同时发送多个请求。Threading是Python的一个标准模块,麻雀虽小,五脏俱全。单线程请求时,5000张照片的结果大约需要8分多钟,多线程请求时需要只需要40多秒即可。请求全部被相应后,即完成了所有照片信息的拼装工作:结果存储在类型为List的lphotos变量中。List是Python中使用最广泛的变量之一,灵活好用,一个顶5个~不过这里有个问题没有解决:在子线程的函数中,调用geoprocessor的addmessage()方法会报错(代码中注释掉的一句),非目前能力所能解决。
题外话:上述多线程的工作也可以用并行计算来解决,这里有一篇出自Flyingis的关于Python中并行计算的文章,供大家学习。随着多核CPU的普及(ps:硅谷小公司推出100核CPU 性能是英特尔四倍),并行计算将会成为开发人员的新宠,微软.NET Framework 4.0中的Parallel Extention也说明了这一点。至于并行计算和多线程之间的区别,援引科班出身的同学胖胖鼠的话:
两者针对性不同。多线程技术是操作系统中的概念,是软件的概念。指进程中的一部分。以前并行计算主要更侧重硬件CPU,现在泛指同时使用多个计算资源解决问题。我感觉两者都用到了并发性并行性的概念。
个人感觉可简单理解为,并行计算是对细枝末节的多线程技术更优的抽象,与一个CPU里的多线程不同,它能利用多个CPU(不同服务器)资源,回归到网格计算的概念。下面继续主题。
第二步:保存数据。之后我们便可以利用geoprocessor完成数据处理工作。首先通过调用Toolbox中的工具创建存储数据的FeatureClass,并调用工具添加相应的字段:
#create the 9.3 geoprocessor
gp=arcgisscripting.create(9.3)
gp.OverwriteOutput=True
myuserid=gp.getparameterastext(0)#"305320"
gp.Workspace=gp.getparameterastext(1)
myfile=os.path.basename(gp.getparameterastext(2))
#create 2 result featureclasses
try:
gp.addmessage("creating featureclasses...")
sr=gp.CreateObject("SpatialReference")
sr.Createfromfile(r"E:Program FilesArcGISCoordinate SystemsGeographic Coordinate SystemsWorldWGS 1984.prj")
gp.Createfeatureclass(gp.workspace,myfile,"POINT","","","",sr)
gp.Addfield(myfile,"owner","TEXT","","",100)
gp.Addfield(myfile,"title","TEXT","","",100)
gp.Addfield(myfile,"photourl","TEXT","","",150)
#gp.Createfeatureclass(gp.workspace,xafile,"POINT",myfile,"","",sr)
del sr
except:
gp.adderror("creating featureclasses error")
raise Exception,"creating featureclasses error"
#push the photos into the featureclass
gp.addmessage("dealing my photos")
dealphotos(myuserid,myfile)
最后两句便是整个功能的入口点了。dealphotos函数如下:
#function to push photos into featureclass
def dealphotos(set,fc):
    photoscount=retrievephotos(set,0,1,"medium")
    gp.addmessage("start to retrieving photos...")
    getphotolist(set,0,photoscount,"medium")
    gp.addmessage("retrieving photos completed")
    cur=gp.InsertCursor(fc)
    descfc=gp.Describe(fc)
    print "begin insert features..."
    gp.addmessage("begin insert features...")
    for photo in lphotos:
        row=cur.NewRow()
        pnt=gp.CreateObject("POINT")
        pnt.x=photo["longitude"]
        pnt.y=photo["latitude"]
        row.Setvalue(descfc.shapefieldname,pnt)
        row.Setvalue("owner",photo["owner_name"])
        row.Setvalue("title",photo["photo_title"])http://www.blogger.com/post-edit.g?blogID=21848155&postID=4114083803361112294#
        row.Setvalue("photourl",photo["photo_file_url"])
        cur.InsertRow(row)
    print "insert features completed"
    gp.addmessage("insert features completed")
    del cur,descfc
好啦,Python部分结束,添加到ArcMap中,便可成为一个Script Tool,与他人分享了。运行界面: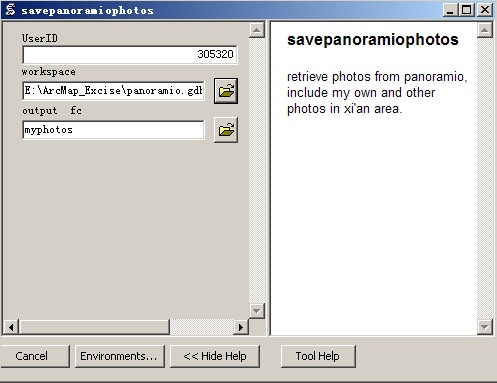
运行结果:
似乎不明显,那就利用空间分析中的Point Density工具抽象一下位置分布信息: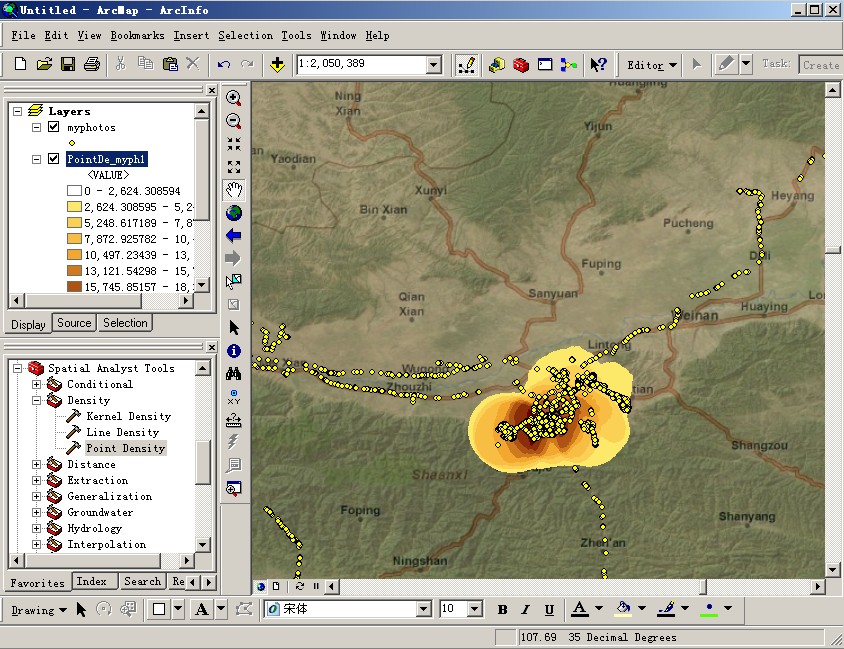
也可以利用Model,将两部分连接起来,做成一个工具来用: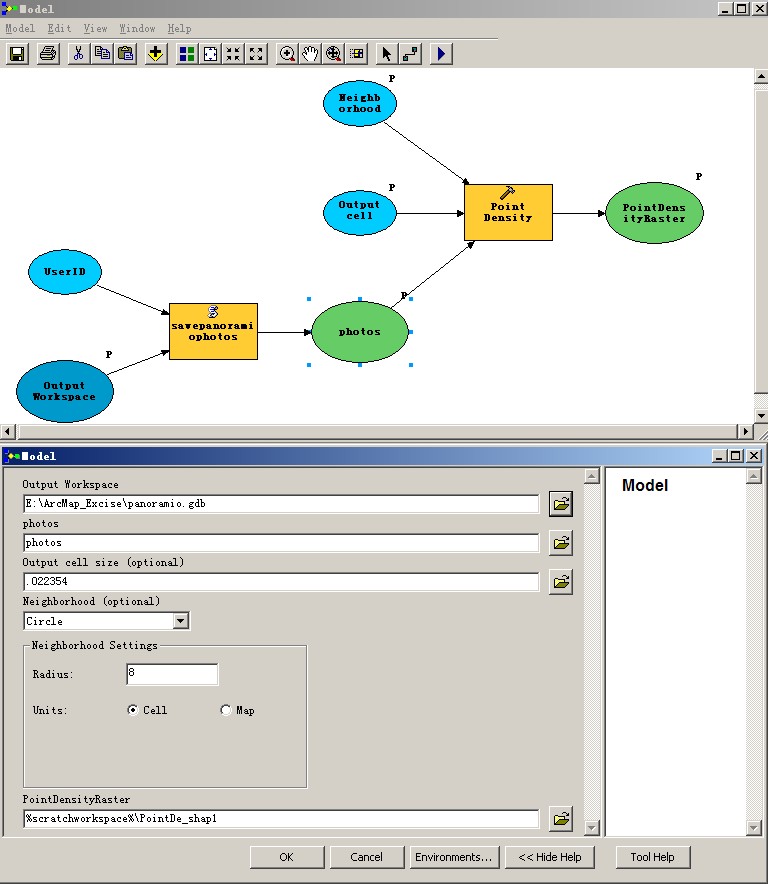
有了地理数据,就可以继续在其他平台下进行处理和展示了:
最后总结一下标题:通过Python,不需要一个stand-alone的程序,就可以快速试验一个想法。
btw:附上最近google map tile的获取方法:
public override string GetTileUrl(int level, int row, int col)
        {
            int servernum = (col + 2 * row) % 4;
            string sec2 = "&s="; // after &zoom=...
            string secword = "Galileo";
            int seclen = ((col * 3) + row) % 8; // corrected from int seclen = ( col + 3 * row ) % 8;
            sec2 += secword.Substring(0, seclen);
//google maps map:
//http://mt1.google.com/vt/lyrs=m@114&hl=zh-CN&x=13&y=5&z=4&s=Gali
//http://mt1.google.com/vt/lyrs=m@114&hl=zh-CN&x=13&y=6&z=4&s=Galil
//http://mt1.google.com/vt/lyrs=m@114&hl=zh-CN&x=13&y=8&z=4&s=Galileo
string baseUrl = "http://mt" + servernum.ToString() + ".google.com/vt/lyrs=m@114&hl=zh-CN&x=";
string url = baseUrl + col.ToString() + "&y=" + row.ToString() + "&z=" + level.ToString() + sec2;
return url;
////google maps satallite
////http://khm1.google.com/kh/v=49&x=3&y=5&z=4&s=Galile
//string baseUrl = "http://khm" + servernum.ToString() + ".google.com/kh/v=49&x=";
//string url = baseUrl + col.ToString() + "&y=" + row.ToString() + "&z=" + level.ToString() + sec2;
//return url;
}